Authentication
All requests to the Neto by Maropost API must be authenticated regardless of whether you’re testing a single request, creating an official add-on, or developing a custom integration. There are two methods of authenticating with a Neto webtore:
- API Key (Basic)
- OAuth
The type you use will depend on whether you’re developing an add-on (public) or a custom integration. Add-ons that will be available in the add-on store must use OAuth to authenticate. Custom add-ons or development can use an API key.
Authenticate with an API Key
There are two types of API keys that you can use to authenticate your add-on with the Neto control panel:
- User Based API Key (recommended)
- Global API Key
User Based API Key
A user based API key is tied directly to the access of a staff user in a merchant’s Control Panel. The access provided by one of these keys can be limited to certain interactions with the API by creating a user permission group.
This method of creating API keys is recommended as it gives a merchant more granular control over the data that an add-on has access to as well as the ability to disable access per add-on.
You can obtain a user based API key by creating a new staff user and generating an API key on their account.
Global API Key
In every Neto control panel there is a single global API key which can interact with all the data that’s available in the API. It is not recommended to use this type of key as it’s not possible to limit the access it provides and in order to revoke access you need to reset the key which others might be using. In general, this type of API key should only be used for things such as testing, experimenting and debugging.
You can obtain your global API key in the control panel by going to Settings & tools > All settings & tools > API.
Usage
An API key must be supplied in the NETOAPI_KEY header of each request.
Authenticate with OAuth
Public add-ons that are listed in the add-on store in the control panel must authenticate using OAuth2.0 to get access to a merchant’s data.
Terminology
If you’re not already familiar with the OAuth2.0 specification, you can read more information about it here. You should be familiar with the following key terms:
- Client: Any add-on that wants to access a merchant’s data. A merchant must grant permission to a client before it can access anything.
- API: Neto's API which a client can use to read and update data in the Control Panel.
- User: A merchant that holds a Neto subscription. The user provides access to a client.
Process
Neto uses OAuth 2.0’s authorisation code grant flow to issue access tokens on behalf of users. The OAuth flow can be initiated from the Neto control panel or directly from your application interface (if applicable). If your add-on requires that the user first have an account in your application you may choose to only allow the add-on to be initiated from your application interface.
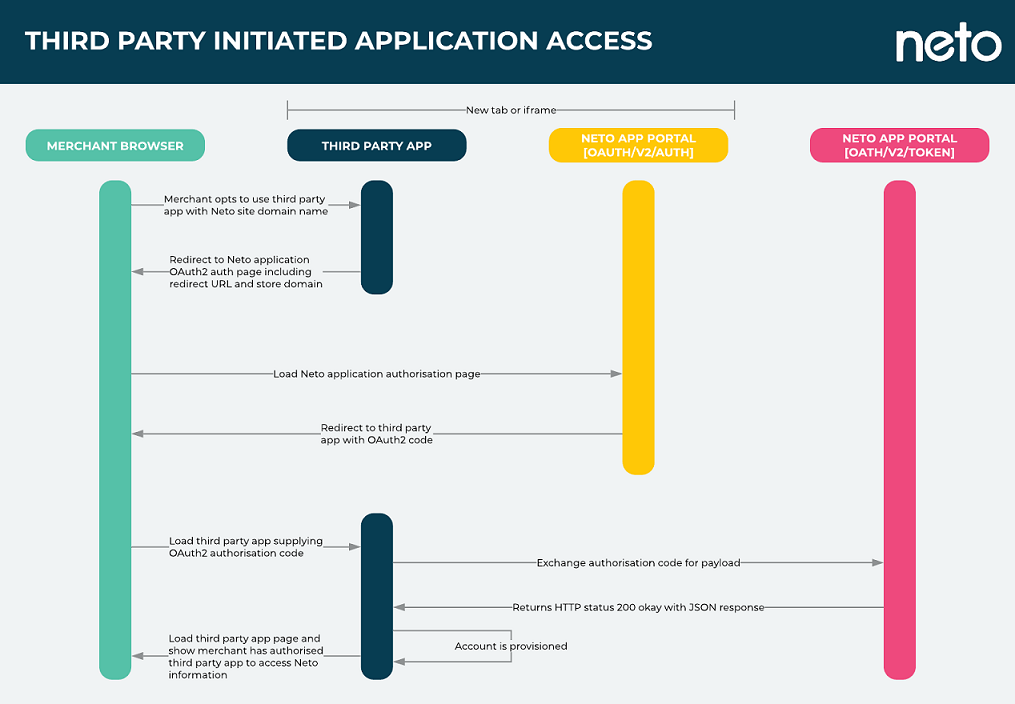
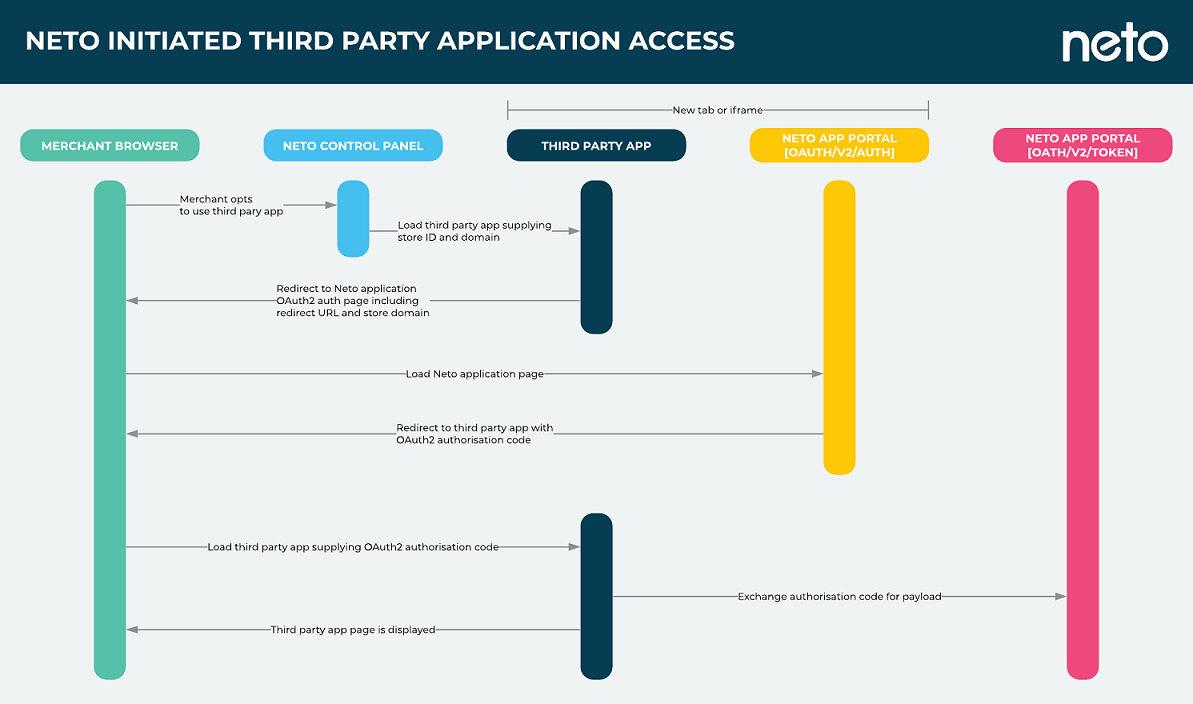
The ideal workflow is as follows:
- A Merchant installs your add-on from their Neto control panel and is redirected to your applications callback URL to initiate the OAuth flow.
- Merchant is redirected from your application to the Neto application authorisation page.
- Merchant logs into their Neto account.
- Neto redirects back to your application callback URL with an Access Code.
- Your application requests an Access Token for the merchant’s account.
- Neto provides an Access Token and the store domain for the particular merchant.
- Your application loads a dashboard or otherwise notifies the merchant that they have successfully connected to your application.
- Your application can now make requests to the Neto API using the obtained Access Token and store domain.
- Neto responds with resources from the merchant’s account.
Obtain Credentials from Neto
You must be an approved add-on developer to obtain OAuth credentials from Neto. Reach out to the Partner Team to register your interest in developing an add-on. API scopes are defined when your credentials are provisioned by the Neto Partner Team.
Not building out an add-on but want API access? Use an API Key setup instead.
Request Authorisation
When a merchant installs your add-on from their control panel they will be redirected to your callback URL with a number of webstore values provided as query strings. Your application should take these values and securely store them, then use them and your existing OAuth credentials to trigger the Neto Apps Auth endpoint to generate an Access Code:
https://apps.getneto.com/oauth/v2/auth?client_id={client_id}&redirect_uri={redirect_uri}&response_type=code&store_domain={store_domain}&state={nonce}Replace all {placeholder} values in the above, where:
client_id: Your application’s Client ID, obtained from the Neto Partner Team.redirect_uri: Your application’s registered Callback URL.store_domain: The store domain of the merchant's account you want authorization for, this should be their current webstore URL without the HTTP protocol.state: A random value unique to each request that you should validate before requesting an Access Token. This is an optional parameter but is recommended for the security of your application.
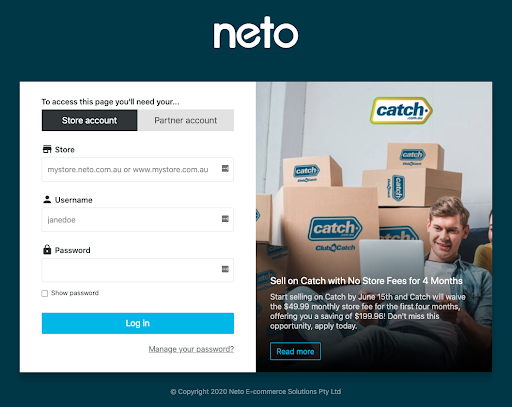
If a merchant is already authenticated they will be redirected back to the Callback URL specified in the redirect_uri value with an Access Code. If the merchant is not yet authenticated they will first be directed to the Neto login portal, then back to your Callback URL with an Access Code:
Request Access Token
Your application can now exchange the provided Access Code for an Access Token. If using the state query in the Neto Apps Auth URL ensure the value returned with the Access Code is the same value you initially set. If not, do not complete the OAuth flow and error out / ask the merchant to reauthenticate. To generate an Access Token send a POST request to the Neto Apps Token endpoint:
https://apps.getneto.com/oauth/v2/tokenInclude the following Keys and Values in your request BODY:
client_id: Your application’s Client ID, obtained from the Neto Partner Team.client_secret: Your application’s Client Secret, obtained from the Neto Partner Team.redirect_uri: The Callback URL that was supplied in the initial Access Code requestgrant_type: provide the value:authorization_codecode: TheAccess Codethat was returned from the successful Access Code request
If the request is successful you will receive a response with an Access Token, the merchant’s store domain, and additional information. E.g:
{
    "scope": "api user address",
    "store_id": "{store_id}",
    "store_domain": "{store_domain}",
    "store_timezone": "Australia/Brisbane",
    "access_token": "{access_token}",
    "user": {
        "id": "{user_id}",
        "first_name": "Neto",
        "last_name": "User",
        "email": "{user_email}”
    },
    "billing_address": {
        "street1": "123 Sample St",
        "street2": "Level 3",
        "city": "Brisbane",
        "state": "Queensland",
        "post_code": "4000",
        "country_name": "Australia",
        "country_code": "AU"
    }
}
Making Authenticated Requests
Now that you have a store domain and Access Token, you can make authenticated requests to the Neto API using the webstores API endpoint e.g: https://{store_domain}/do/WS/NetoAPI
You will need to supply the following headers instead of the standard NETOAPI_USERNAME and NETOAPI_KEY headers:
- X_ACCESS_KEY: Your application’s Client ID
- X_SECRET_KEY: The Access Token returned from the token response
As an example, a full GetItem API request using OAuth authentication would look something like this in Curl:
NETOAPI_ACTION='GetItem'
WEBSTORE='www.mywebstore.com.au'
X_ACCESS_KEY='1234_example_client_id_5678'
X_SECRET_KEY='abc_example_access_token_xyz'

curl --data '{ "Filter": { "Visible": ["True"], "IsActive": ["True"], "Page": "0", "Limit": "100", "OutputSelector": ["Model"] }}' \
--header "NETOAPI_ACTION: ${NETOAPI_ACTION}" \
--header "X_ACCESS_KEY: ${X_ACCESS_KEY}" \
--header "X_SECRET_KEY: ${X_SECRET_KEY}" \
--header "Content-Type: application/json" \
--header "Accept: application/json" \
--request POST https://${WEBSTORE}/do/WS/NetoAPI \